How to Use a Green Screen for Viral Videos in 2026
Other
Using a green screen is a surprisingly simple process once you nail the basics. You light your green backdrop evenly, film yourself in front of it, and then use editing software to digitally remove the green color. From there, you can drop in any background you can imagine.
This technique, called chroma keying, is a total game-changer for content creation . It's the key to producing an endless stream of videos from a single filming session, saving you a massive amount of time and effort.
Why Green Screens Are a Creator's Secret Weapon
Ever wonder how your favorite creators pump out so many high-quality videos with different, eye-catching backdrops? The answer is often a simple green screen.
This isn't just a fancy Hollywood special effect anymore. It’s an incredibly practical tool for YouTubers, marketers, and podcasters who need to make dynamic videos without spending all their time on production. Using one gives you total control over your environment, which is a huge win for keeping your content consistent and professional.
The real magic is simple: shoot once, and repurpose endlessly. By filming against a neutral green background, you can swap in dozens of different visuals later, tailoring one video for multiple platforms or topics without ever filming again.
To give you a bird's-eye view, here's a quick checklist of the core components we'll be covering. Think of this as your roadmap to a perfect green screen setup.
Green Screen Quick Start Checklist
ComponentKey ConsiderationWhy It Matters
Space
Find a spot with enough room to separate subject and screen.
Prevents green light from spilling onto your subject, a common mistake that screams "amateur."
Backdrop
Use a smooth, wrinkle-free green screen.
Wrinkles and shadows make it harder to get a clean key, causing glitchy, unprofessional results.
Lighting
Light the screen and subject separately and evenly.
Uneven lighting is the #1 cause of a bad chroma key. Proper lighting can cut your editing time by over 50%.
Camera Settings
Shoot with a high shutter speed and low ISO.
This reduces motion blur and digital noise, giving your software more clean data for a flawless edit.
Wardrobe
Avoid green clothing, shiny jewelry, and fine patterns.
These can disappear into the background or cause distracting visual artifacts that are a nightmare to fix.
This table covers the essentials, and now we'll dive into exactly how to nail each one with actionable steps.
From Hollywood to Your Home Studio
Green screen tech has been around since the 1940s, starting with early blue screen experiments that transformed filmmaking. That same core idea is now a staple for creators. Green became the go-to color because it doesn't clash with most skin tones or clothing, which means fewer weird artifacts around your subject after you key out the background.
Modern editing software can pull an incredibly clean key, making the effect look completely natural. If you're a history buff, you can find more on the origins of this tech over on Broadley.tv .
This efficiency is where the real power for content repurposing comes in. For example, you can:
- Pull key moments from a long podcast or webinar.
- Drop in dynamic, topic-specific backgrounds to create engaging shorts.
- Keep a consistent, branded look across all your videos, no matter where you filmed.
This approach completely streamlines your workflow. You can turn one long-form video into a dozen polished shorts with unique backdrops, setting you up for massive content growth—all from one smart setup. For more ideas on leveling up your videos, check out our other guides on content creation .
Your Guide to a Flawless Green Screen Setup
The secret to a killer green screen effect isn’t a complicated editing trick—it’s all in the setup. I can't tell you how many hours I've seen creators lose trying to fix a bad shoot in post-production. Get the physical environment right from the start, and the rest becomes infinitely easier.
Think of your green backdrop as a blank canvas. The smoother and cleaner it is, the easier your software can “paint” over it with your new background. You can go with a portable fabric screen, a big roll of paper, or even paint a wall with special chroma key paint. Honestly, for most creators, a simple fabric screen offers the best mix of cost and flexibility.
This is the basic workflow you'll follow, from setting up your space to getting your clips ready for social media.
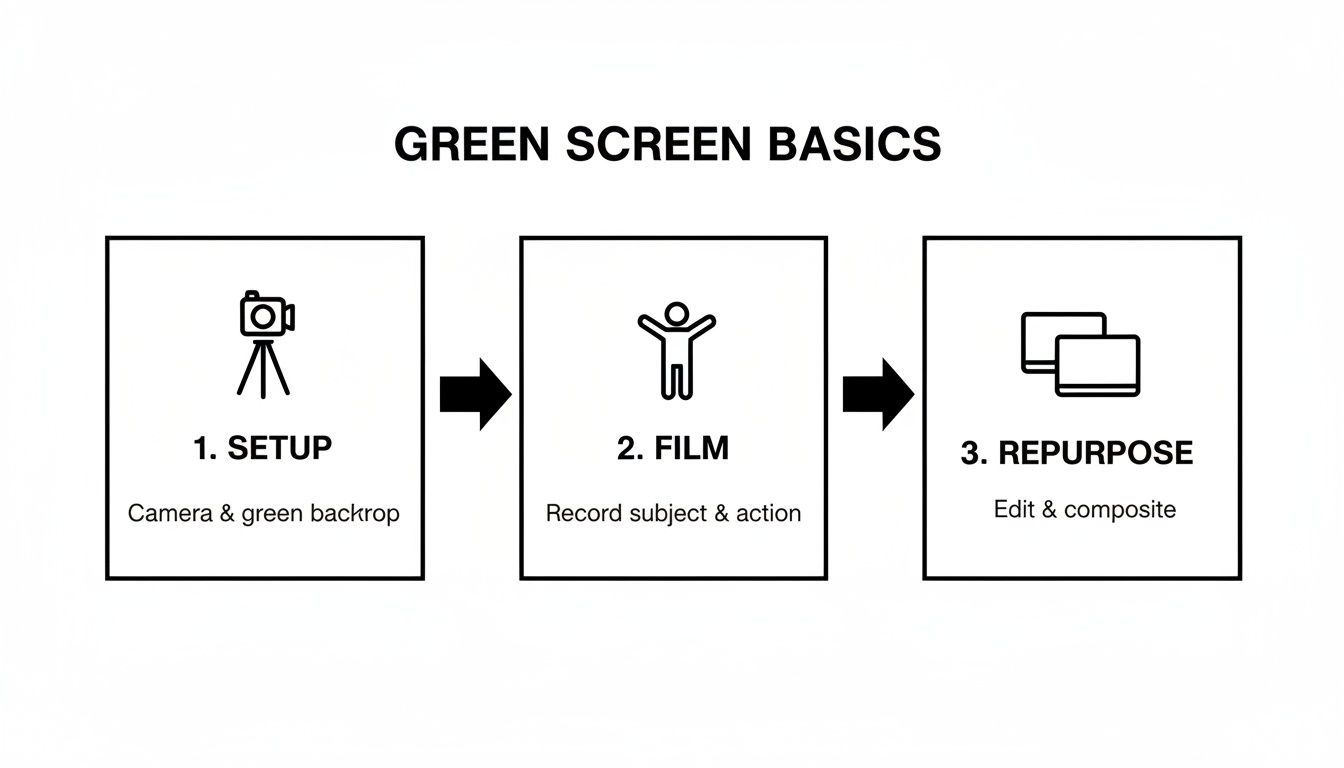
The key takeaway here is that shooting is just one part of it. The real power comes from being able to repurpose that same footage across all your platforms.
No matter which backdrop you choose, the goal is always the same: a perfectly smooth, non-reflective, and evenly lit surface. Every little wrinkle or crease in a fabric screen casts a tiny shadow. Each shadow is a slightly different shade of green, which gives your editing software a massive headache when it tries to key it all out.
Prepping Your Backdrop for a Clean Key
Before you even touch your camera, your backdrop needs some love. If you're using a fabric screen, do not skip this step: steam or iron out every single wrinkle. Then, pull the fabric as taut as you can on its stand so there are no sags. It feels tedious, I know, but this 15-minute task can save you hours of frustrating cleanup later.
Now, think about your space. You need to create some distance between your subject and the screen—aim for at least six feet (about two meters). This is non-negotiable for two critical reasons:
- It stops your subject's shadow from falling onto the green screen.
- It dramatically reduces color spill, which is that nasty green light that bounces off the screen and onto your subject.
The single biggest mistake beginners make is standing too close to their screen. That's how you get that weird green halo around your hair and shoulders. It’s a dead giveaway that you're using a green screen and it's a nightmare to fix without making your footage look fake.
Lighting Your Screen and Subject Separately
Once your backdrop is smooth and your subject is in position, it's time for lights. The golden rule here is to light your green screen and your subject independently. You can't properly light both with the same one or two lights. It just doesn't work.
Start with the green screen. You'll need at least two soft, diffused lights, one on each side, pointed directly at the screen. Your goal is to create a flat, even wash of light with zero shadows or "hot spots" (areas that look visibly brighter).
A quick way to check for evenness is to use a light meter app on your phone. Just point it at different spots on the screen—the center, the corners, the top, and bottom. The readings should all be nearly identical.
A matte green screen with no shine is your best friend here; even affordable kits from Amazon will do the job. A 2022 survey found that 68% of video professionals use green screens weekly because it helps them cut production time by up to 70% compared to manual rotoscoping. You can learn more about professional green screen techniques to see just how much difference a proper setup makes.
Only after your screen is perfectly lit should you light your subject. A classic three-point lighting setup (key light, fill light, and back/hair light) is perfect. This will make your subject look polished and help separate them cleanly from the background.
Filming and Wardrobe Choices That Save You Headaches
Alright, your space is prepped and your lights are dialed in. It’s time to hit record.
This is where all that prep work pays off. The choices you make right now—from your camera settings to the shirt you're wearing—will either save you hours of post-production headaches or create a whole new set of them.
First things first, let's talk camera settings. Your goal here is to give your editing software the cleanest, most detailed information possible. If your camera can handle it, shooting in 4K resolution with 10-bit 4:2:2 color is the gold standard. This combination captures millions more colors than standard 8-bit video, giving the chroma keyer a much richer dataset to work with for a cleaner separation.
It might sound overly technical, but just think of it like this: your software is trying to trace a perfect outline around you. A fuzzy, low-resolution image makes for a sloppy, jagged trace. But a sharp, highly detailed image? That lets it draw a clean, crisp line with ease.
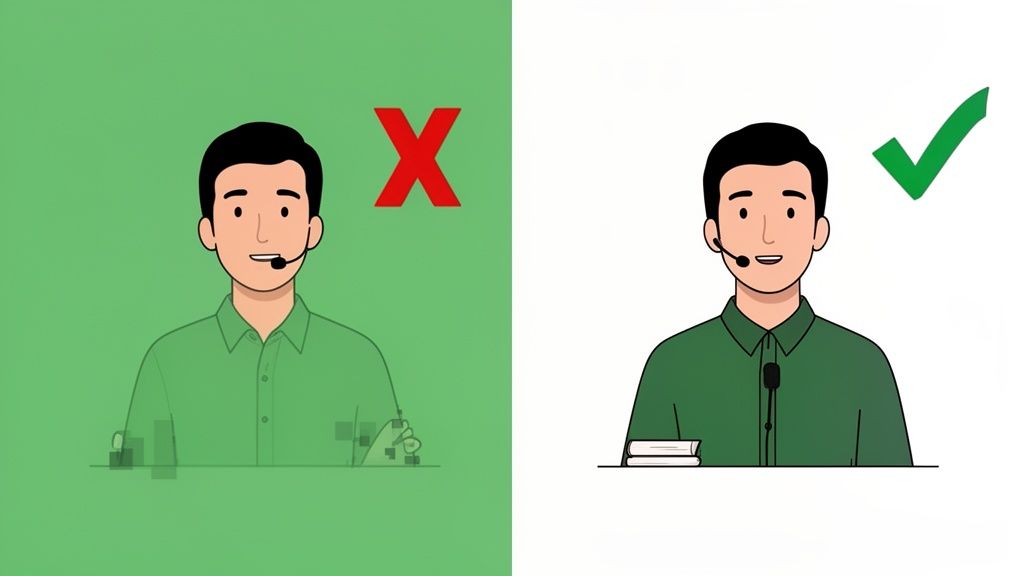
What to Wear When Using a Green Screen
Just as important as your camera settings is your wardrobe. What you wear can make or break your chroma key. The number one rule is simple but non-negotiable: do not wear anything green. Any green on your clothes or props will be keyed out right along with the background, leaving you with a transparent torso or floating hands.
But it goes beyond just avoiding the color green. Certain materials and patterns are a nightmare in post-production. Keep this checklist in mind:
- Shiny or Reflective Stuff: Ditch the jewelry, glossy fabrics, or anything that might catch a reflection from the screen. Those little green hotspots are a massive pain for the keying software to deal with.
- Fine Patterns: Things like houndstooth, tight pinstripes, or small checkerboards can create a weird, distracting visual shimmer called a moiré pattern on camera. Solid colors are always a safer bet.
- Fuzzy or Sheer Materials: Wispy fabrics, translucent clothing, and even frizzy hair can be tough for the keyer to isolate without looking glitchy.
I once spent an entire afternoon trying to fix footage of a speaker who wore a necklace with a tiny green gemstone. The keying software kept punching a flickering hole in their chest. It’s the kind of small detail that can mushroom into a huge post-production problem.
Don't Forget About Audio Quality
Finally, don't let gorgeous visuals get torpedoed by terrible audio. A Wyzowl study found that 88% of people have been convinced to buy a product or service by watching a brand's video, and clean audio is a huge part of that professional feel.
The simplest way to get great audio is with an external microphone. A lapel mic (or lavalier) clipped to your shirt is a fantastic, affordable choice for capturing crisp dialogue. It keeps the mic close to your mouth and cuts down on room echo.
Remember, you're using a green screen to create a professional look. Your audio needs to live up to that standard. For most viewers, bad sound is a much bigger dealbreaker than slightly imperfect video.
Chroma Keying Your Footage in Editing Software
Okay, you've nailed the shoot and your footage is in the can. Now for the fun part: making that green background disappear. This process is called chroma keying, and it's how you'll digitally remove the green and replace it with whatever world you want to create.
Don't let the technical name scare you. It’s essentially a digital magic eraser. Your editing software finds all the green pixels in your video and makes them transparent, letting you slide a new background image or video clip underneath. And no, you don't need a Hollywood-sized budget to pull it off.
Picking the Right Tool for the Job
Most modern video editors, whether on your desktop or phone, have a chroma key effect built right in. The core idea is always the same: apply the effect, tell it which color to remove, and then tweak the settings to clean it up.
Here’s a quick look at some of the most popular options out there.
Chroma Key Software Comparison
SoftwareBest ForKeying ToolEase of UseCost
Professional Editors
Ultra Key
Intermediate
Subscription
Mac-based Professionals
Keyer
Intermediate
One-time Fee
Color Grading & VFX
3D Keyer (Fusion/Color)
Advanced
Free / One-time Fee
Social Media Creators
Chroma Key
Beginner
Free / Subscription
Online & Quick Edits
Chroma Key
Beginner
Free / Subscription
Each of these tools gets the job done, but the secret to a great key isn't just the software—it's knowing how to finesse the settings.
Your Go-To Workflow for a Clean Key
In a pro-level editor like Adobe Premiere Pro or Final Cut Pro , you'll look for an effect called “Ultra Key” or simply “Keyer.” If you’re using the free version of DaVinci Resolve , the “3D Keyer” in the Color or Fusion page is your best friend.
The workflow is pretty straightforward: drop the keying effect onto your clip, grab the eyedropper tool, and click on the green background. Poof. It’s gone. From there, it’s all about fine-tuning.
This process has become incredibly fast. For example, mobile editors like CapCut can get you a decent key in under 30 seconds. This accessibility is why green screen use in social media content has exploded by over 300% since 2020, helping creators drive much higher engagement. You can learn more about how creators are using these effects over at ScreenPal .
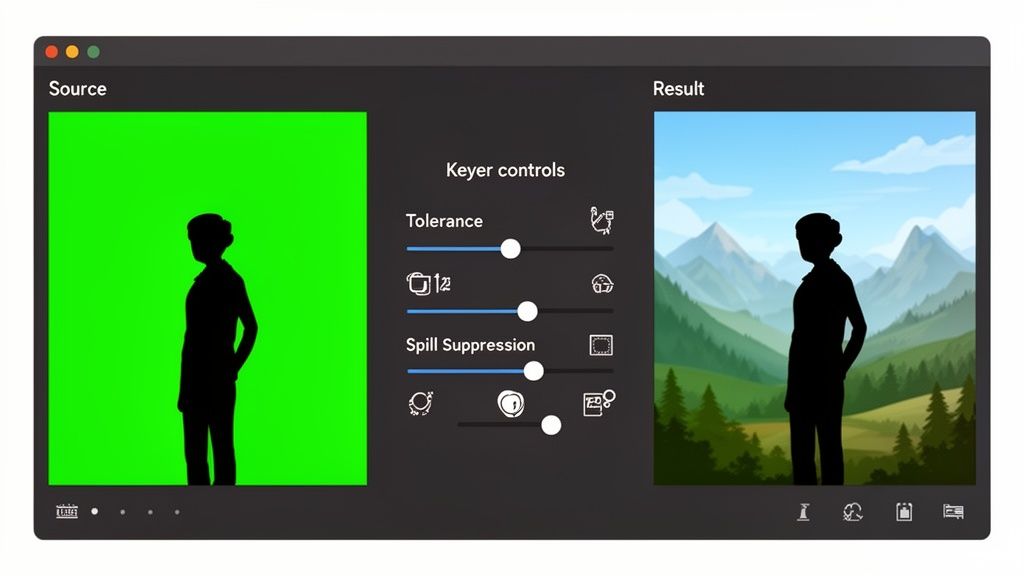
Refining Your Edges for a Believable Look
Getting rid of the green is just step one. The real mark of a pro is clean, believable edges. A fuzzy, pixelated outline around your subject is a dead giveaway that the effect was rushed.
To get it right, you'll need to master a few key sliders in your effects panel:
- Tolerance/Sensitivity: This tells the software how broad of a green spectrum to remove. Push it too far, and you’ll start eating into your subject. Not far enough, and you’ll have patches of green left in the background. A good starting point is to adjust this until all the background green is gone, then dial it back slightly.
- Matte Finesse/Edge Thin: These are for cleaning up the very edge of your subject. They help you shrink or feather the matte (the outline of your subject) to eliminate any lingering green pixels. Use these sparingly—a change of just 1-2 points can make a huge difference.
- Spill Suppression: This is a lifesaver. It tackles that ugly green halo that light bouncing off the screen creates on a subject's hair or shoulders. Go easy with this one, as too much can give your edges an unnatural magenta tint.
The best way to check your work is to switch to the "Alpha Channel" or "Matte" view. This gives you a black-and-white image of your key. Your subject should be solid white, and the background solid black. Any gray spots signal transparency issues you need to fix.
Once your key is looking sharp, just drop your new background on the video track below your subject. The final touch is to match the lighting and color of your subject to the new background. This is what truly sells the illusion.
If you’re editing specifically for short-form video, you might want to check out our guide on the best TikTok editing apps to find tools that make this whole process even faster.
Turning Green Screen Clips Into Social Media Gold
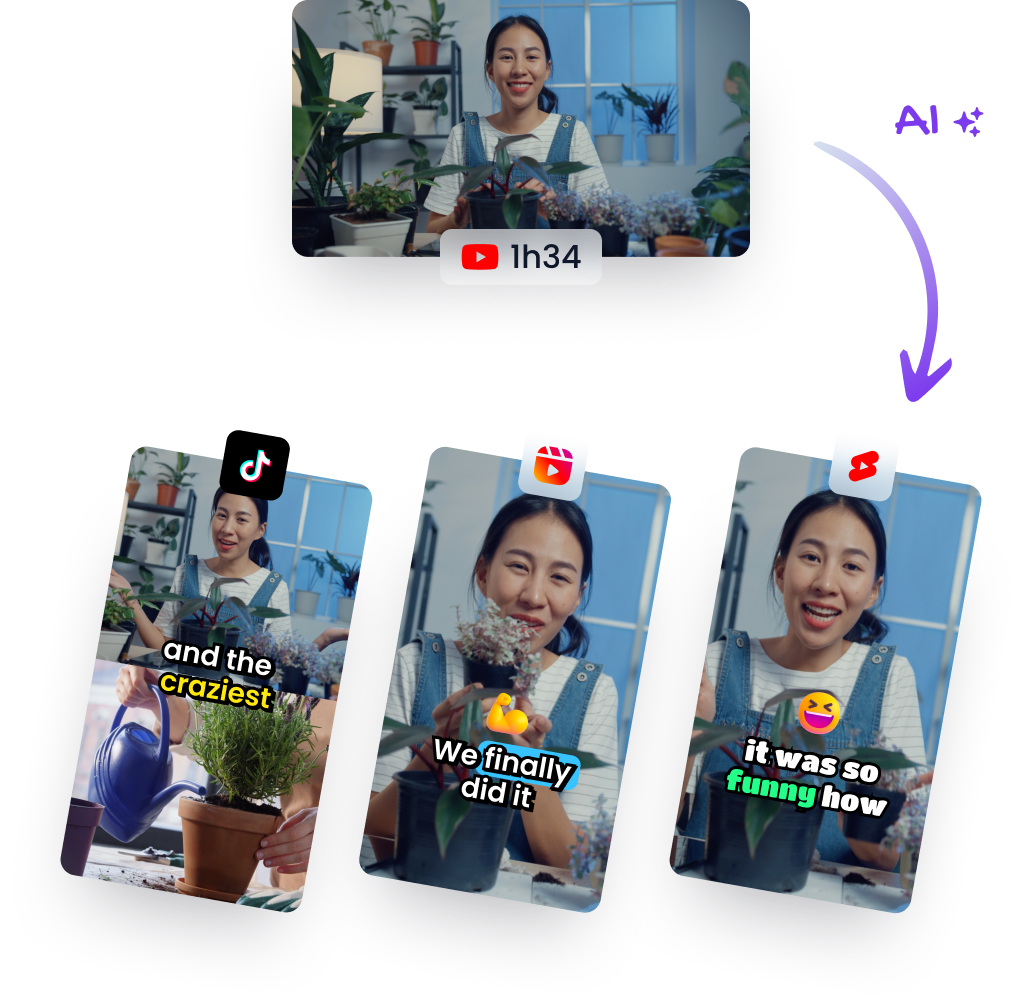
Okay, so you've nailed the technical side of shooting with a green screen. Now for the fun part: turning that footage into a content machine for social media. The real magic of green screen isn't just swapping out backgrounds; it's about creating an endless stream of engaging clips from a single video shoot.
The smartest way to do this is through content repurposing. Instead of filming dozens of individual shorts, you shoot one long-form video—like a podcast episode or a webinar. From there, you can use AI to find the most compelling moments for you.
Repurpose Your Content with AI and Green Screen
Start by uploading your long video to a platform that can slice it into viral-worthy clips. For example, using an AI shorts maker can automatically spot the best hooks and package them into vertical videos perfect for social media.
This is where your new green screen skills really shine. Take those AI-selected clips and give them a major upgrade. Imagine turning a standard talking-head interview into a dynamic scene where you're "on location" discussing the topic, or adding animated data visualizations behind you as you break down a key insight.
This workflow isn't just efficient; it’s incredibly effective. In education, green screen projects have been shown to boost student engagement by as much as 65%. Podcasters and YouTubers can borrow this same idea by overlaying event visuals or dynamic backgrounds onto their clips, creating formats that see 2x more shares on Instagram.
Optimize Your Clips for Vertical Video
Once you have your AI-generated clip and a fresh background, you need to format it for platforms like TikTok, Instagram Reels, and YouTube Shorts. That means reframing everything for a 9:16 vertical aspect ratio.
Your editing software will let you crop and reposition your footage to make sure the most important elements stay front and center.
Here are a few tips to keep in mind:
- Reframe for focus: Keep your face centered and easy to see. In a vertical frame, you are the main event.
- Add auto-captions: Over 85% of social videos are watched on silent. Add bold, easy-to-read captions to every single clip to keep viewers hooked.
- Build a consistent look: Use your green screen to establish a consistent brand aesthetic with custom backgrounds, logos, or color palettes.
By combining AI clip generation with creative green screen backgrounds, you're not just repurposing content—you're transforming it. A single hour-long podcast can become a week's worth of high-quality, engaging social media posts that look like they each had a custom production.
Once your green screen clips are professionally edited and ready to go, you can put some budget behind them to amplify their reach. Understanding the best practices for Facebook Ads can give your new content a significant boost in visibility and engagement, helping you scale your output and grow your audience without burning out.
Common Green Screen Questions Answered
No matter how well you prepare, shooting with a green screen for the first time always comes with a few head-scratchers. Minor issues are bound to pop up, but the good news is that most of them have simple fixes.
Let's walk through some of the most common questions and problems creators run into. Think of this as your personal troubleshooting guide to solve issues fast, without having to guess your way through it.
Why Is It Always Green?
You’ve probably wondered why green is the magic color for this effect. It's all about contrast. On the color spectrum, chroma key green is one of the colors furthest from human skin tones. This stark difference makes it incredibly easy for your editing software to select and remove only the background, without taking a chunk out of your subject.
While blue screens are also an option (you saw them a lot in older films), modern digital cameras are far more sensitive to green. This means they capture more detail in the green channel, allowing you to get a clean, crisp key with less light—perfect for a home studio setup.
Can I Just Use a Blanket or a Painted Wall?
Yes, you can definitely go the DIY route instead of buying a professional screen, but you need to know the trade-offs. Painting a wall with a specific, non-reflective chroma key green paint can give you a fantastic, permanent backdrop, as long as the wall is perfectly smooth.
Using a blanket or sheet is much trickier. The absolute enemy of a good key is wrinkles. Every little crease and fold creates a tiny shadow, which means your software sees thousands of different shades of green instead of one solid color. If you’re using fabric, it must be stretched completely taut to get rid of every single sag.
I’ve seen countless creators try to fix a wrinkly backdrop in post-production, and it almost never works well. The time you spend steaming and stretching a fabric screen will save you hours of frustrating editing later. A smooth surface is non-negotiable for a professional result.
How Do I Fix That Green Halo or Spill?
That faint green outline you see bleeding onto your subject's hair or shoulders is called spill, and it’s one of the most common headaches in green screen work. The best way to fix it is to prevent it from happening in the first place.
Simply increase the distance between your subject and the green screen to at least six feet (about two meters). This one change makes a massive difference by reducing how much green light can bounce off the screen and onto your subject.
If you still notice some spill in your footage, don't worry. Every major editing tool has a "spill suppression" or "despill" function. Be gentle with this setting. You only need to increase it just enough to kill the green tint, not so much that your subject’s edges start looking discolored or weird.
What Is the Minimum Lighting I Need?
You don't need a Hollywood-level lighting budget to get a great result. A simple, effective setup is totally achievable with just three lights.
- Two lights for the screen: Your main goal here is to light the backdrop evenly. Place one light on each side and aim them at the screen to create a flat, shadow-free wash of light.
- One light for the subject: This is your primary "key light," which will illuminate you or your subject.
If you're on a tight budget, a few clamp lights from the hardware store with bright, daylight-balanced LED bulbs will get the job done. Just remember, evenness on the screen is far more important than raw power.
Ready to turn your green screen footage into dozens of engaging social media clips? Let Klap do the heavy lifting. Our AI finds the most viral-worthy moments in your long videos and automatically creates ready-to-post shorts. Try it for free and start repurposing your content today at https://klap.app .